Easier deployments of Custom Connectors
We continue to see a great momentum in our connector ecosystems for the Power Platform. Every week and every month, we release new connectors and updates to many connectors. We now have over 600 certified connectors. Apart from the certified connectors, many enterprises use custom connectors – for connecting to their internal APIs or simply to augment the connectivity requirements where the OOB certified connectors are not enough.
In this blog, I want to highlight some of the recent updates we are releasing in our platform for custom connectors. These changes are being rolled out, and will provide a better experience to enable a seamless ALM (application lifecycle management) for custom connectors. In Power Platform, Solutions are used to package components and deploy those components to various environment, customizing them as needed. The updates include:
- Users (makers) can now add any existing custom connectors to a Solution
- Users (makers) can create and use Environment variables in custom connectors
- Secrets used for OAUTH settings can be stored securely in Azure Key Vault
- Updated API documentation for custom connectors
With the above features, you can now easily enable end-to-end ALM for custom connectors. Any existing custom connector can now be added into a Solution. You do not have to start building your customer connector anew from inside a Solution. Environment specific values like API endpoints and OAUTH app details, can be externalized now in Environment variables and referenced by custom connectors. You do not need to update your custom connectors in different environments; and apps and flows targeting the custom connectors do not have to be modified in different environments. Finally, you can store your secrets using in your custom connectors in Azure Key Vault and use it via an Environment variable in your custom connector.
Let’s walk through an example.
We will use the Service Now custom connector available in our GitHub repo to illustrate these features, but you can use any custom connector.
First, we need to create the Service Now custom connector. You can sign up for a developer instance from Service Now if you need an instance. The Service Now custom connector supports OAUTH based authentication and there are certain configuration steps you need to do to enable that. It is fairly straight-forward though, and you can follow the documentation of the custom connector. You can watch this short video as well on how you can create the custom connector.
Next, we want to setup the connector so that we can externalize environment specific settings. In our case, we would want to externalize the Service Now Instance, and the OAUTH application details. Typically, if you are developing, you may be working on your own developer instance. In a production or UAT environment, you may want the connector to point to your production Service Now instance, and you may not have the necessary privilege to setup the OAUTH application.
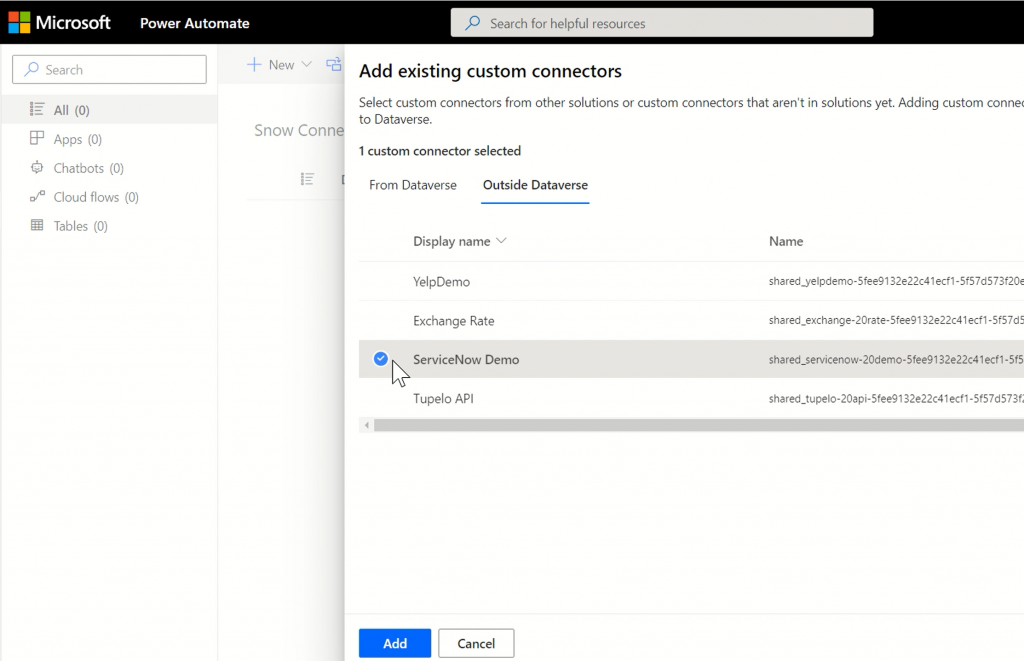
To do that, lets create a Solution called “Snow Connector”, and add our custom connector. You can do that by selecting +Add Existing > Automation > Custom connector. You can see your custom connector in the “Outside Dataverse” category. Select the connector and click Add.
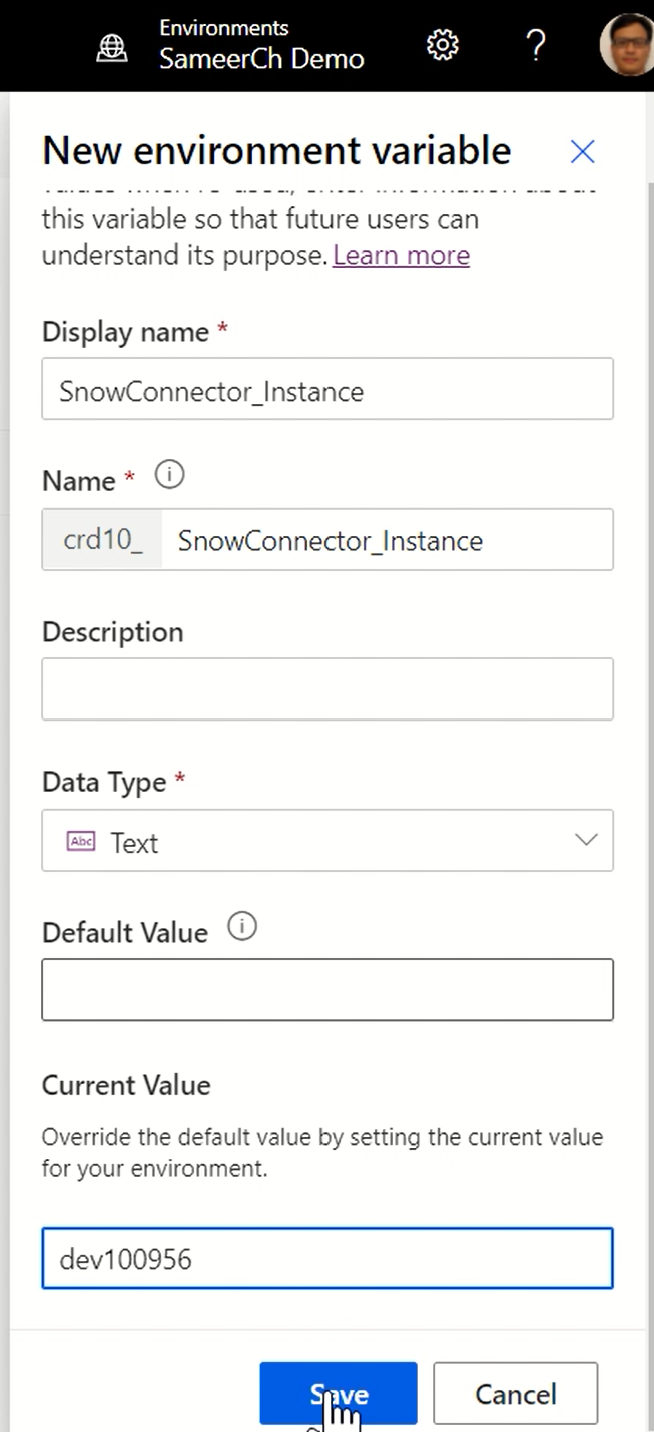
The next step is to create the Environment variables . To do that, select +New > More > Environment variable. Specify a display name, say SnowConnector_Instance, for the Environment variable and add the value which should be the instance name for your Service Now instance.
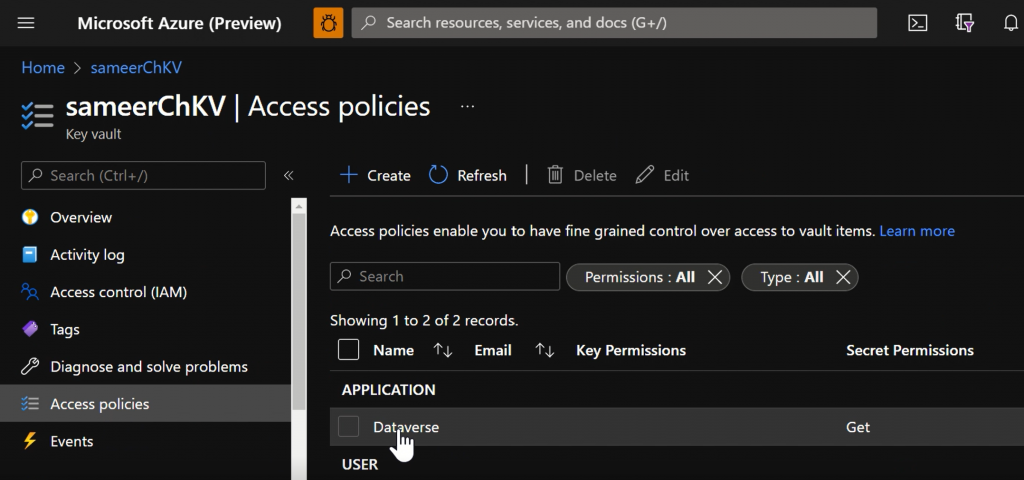
We need to add two other Environment variables for the OAUTH Client ID and OAUTH Client Secret. Because these are secrets, we will use the recently released feature of using Azure Key Vault as the secret store for these Environment variables. Create an Azure Key Vault account, add your secrets – one for the OAUTH Client ID and another for OAUTH Client Secret. Then, follow the instructions in our documentation to specify an access policy that will provide the Dataverse Application a read permission for secrets.
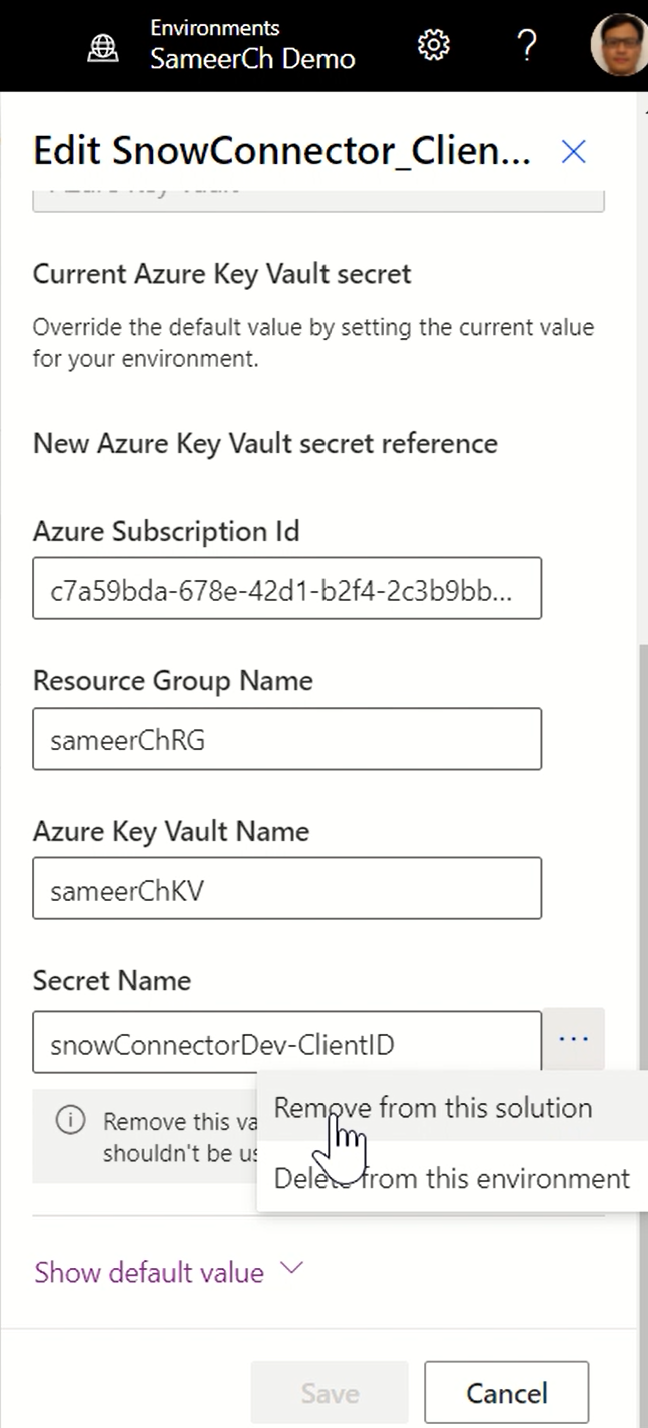
In your Solution, add a new Environment variable (called SnowConnector_ClientID) for the Client ID, specifying the Data type as “Secret”, the Secret Store as “Azure Key Vault”, and then add a reference to your secret specifying the Subscription Id, Resource Group name, Key Vault name and the Secret name.
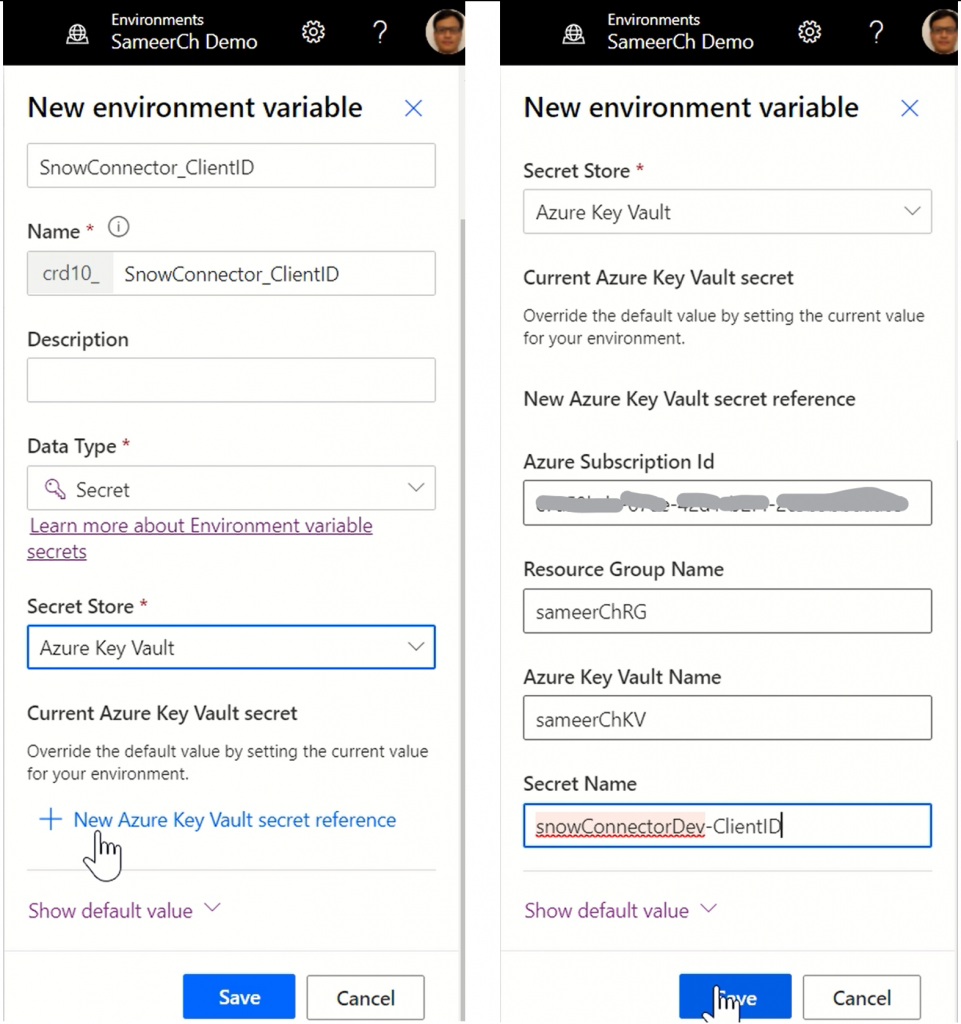
Similarly, add another Environment variable (called SnowConnector_ClientSecret) for the Client Secret.
Because we are going to use the values of these Environment variables only in this environment, we want to make sure that the value are removed from the Solution. To do that, select the environment variable, scroll down to the Current value, select … > Remove from this solution.
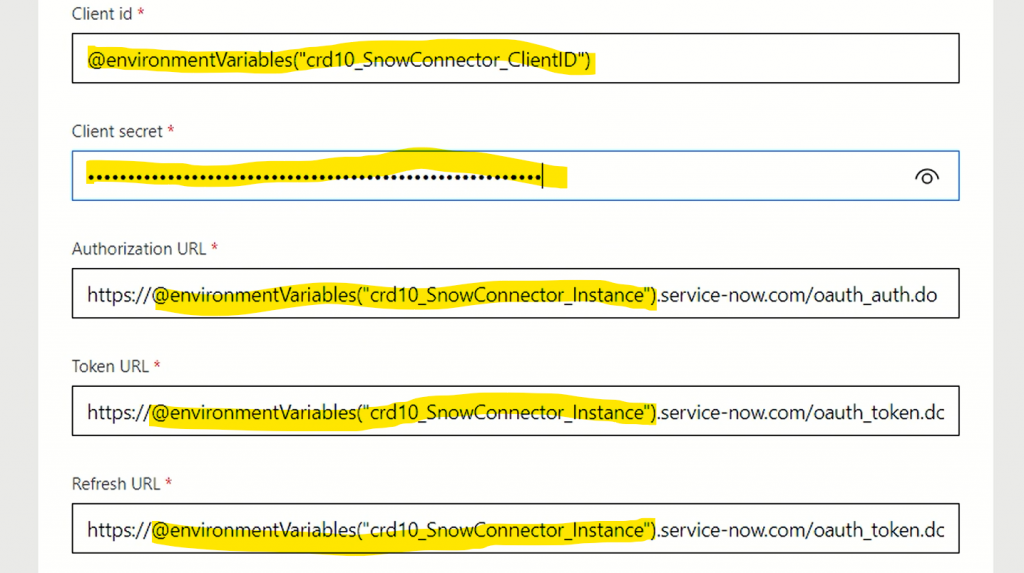
The next step for us is to use these environment variables in our custom connector. To do that, edit custom connector and use the following formula @environmentVariables(“env_variable_name”). For our case, I updated the values for Host, and OAUTH security settings in our connector. For my Solution, this is:
Instance Name: @environmentVariables(“crd10_SnowConnector_Instance”)
Client ID: @environmentVariables(“crd10_SnowConnector_ClientID”)
Client Secret: @environmentVariables(“crd10_snowConnector_ClientSecret”)
Make sure you replace the Instance name at multiple places (Host, Authorization URL, Token URL and Refresh URL). The Client secret value is masked in the UI. See below:

Save your custom connector. And test to make sure that it is working.
Now, all you need to do is export the solution. For that, you go back to the Solutions list, select the “Snow Connector” solution, and click Export. Click Next > Export. Your Solution will now be exported and automatically downloaded as a .zip file.

You can then login to your test environment and import the Solution. While importing the Solution in the new environment, you can specify the values for the Environment variables. These values need not be the same as the one you used in the developer environment, but can be customized for the specific environment. For the Client ID and Client Secret, you can specify the value in the following format:
/subscriptions/{Subscription ID}/resourceGroups/{Resource Group Name}/providers/Microsoft.KeyVault/vaults/{Key Vault Name}/secrets/{Secret Name}
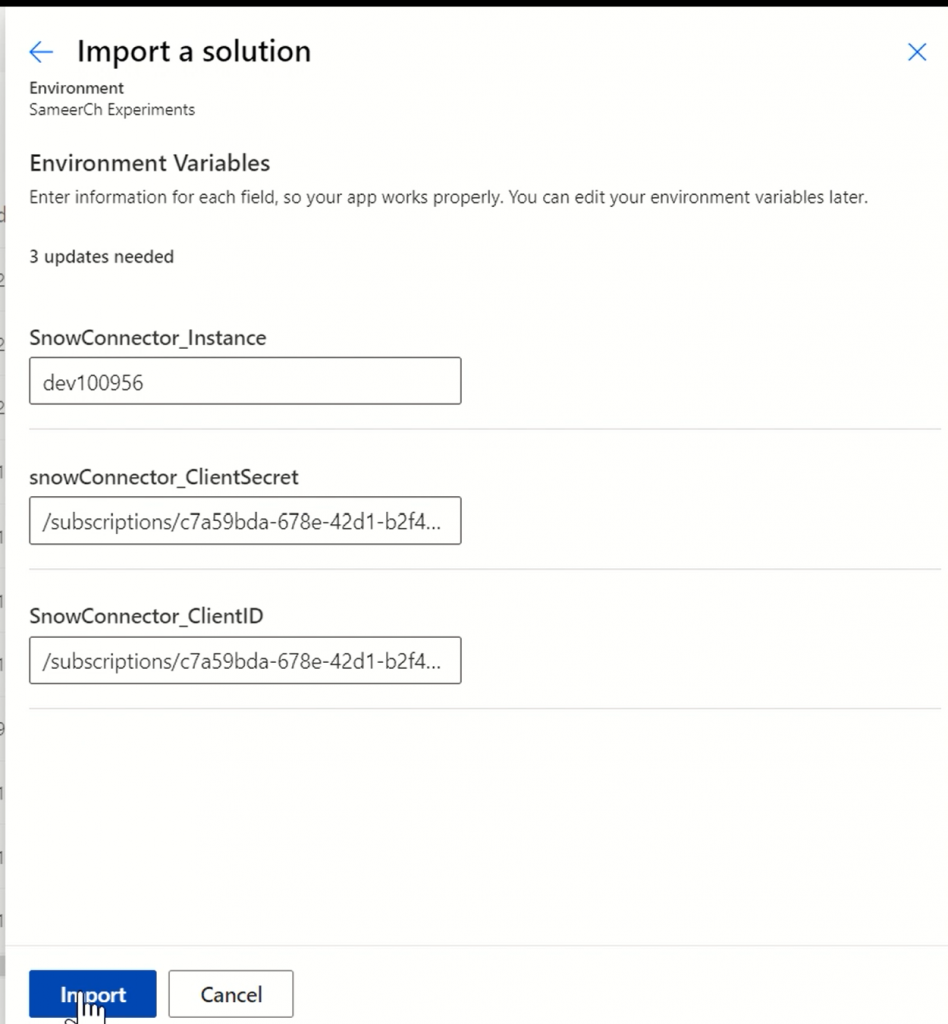
Once you are done with the import, you should be able to create a connection to your custom connector.
This walkthrough provides an overview of the end to end experience for packaging and deploying custom connectors across environments. You can leverage other ALM features like deploying the Solution from an Azure DevOps CI/CD pipeline by providing a deployment settings file as well.
There are still some limitations at the moment—
- Any change to an EV value is currently not reflected on the custom connector automatically. The changes are reflected only after an update of the custom connector.
- Environment variables in a custom connector can only be referenced from the Host/Base path and the security settings. Specifically, it is not supported in policies or within the operation definition.
- [Edit 2/10/2022] Environment variables using Azure Key Vault secrets can now
cannotbe deployed from an Azure DevOps and GitHub pipeline. Read the blog here.
Please try these features out, and do share any feedback you may have.
Happy Automating!


